防火墙环境搭建
1.网络拓扑图
如下:
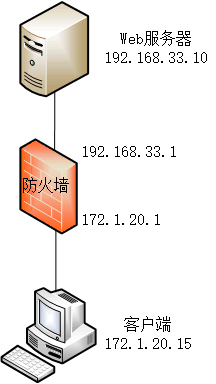
主机(ubuntu 16.04)作路由器,架设防火墙,在主机上使用Vagrant和Virtualbox建立两台虚拟机,一台作Web服务器,一台作客户端,按上图设置ip地址。
Web服务器Vagrantfile参考如下:1
2
3
4
5
6
7
8
9
10
11
12
13
14
15
16
17
18
19
20
21
22
23
24
25
26
27
28
29
30
31
32
33
34
35
36
37
38
39
40
41
42
43
44
45
46
47
48
49
50
51
52
53
54
55
56
57
58
59
60
61
62
63
64
65
66
67
68
69
70
71
72
73
74
75
76# -*- mode: ruby -*-
# vi: set ft=ruby :
# All Vagrant configuration is done below. The "2" in Vagrant.configure
# configures the configuration version (we support older styles for
# backwards compatibility). Please don't change it unless you know what
# you're doing.
Vagrant.configure("2") do |config|
# The most common configuration options are documented and commented below.
# For a complete reference, please see the online documentation at
# https://docs.vagrantup.com.
# Every Vagrant development environment requires a box. You can search for
# boxes at https://vagrantcloud.com/search.
config.vm.box = "ubuntu/trusty64"
# config.vm.define "ubuntu-server"
config.vm.hostname ="ubuntu-server"
# Disable automatic box update checking. If you disable this, then
# boxes will only be checked for updates when the user runs
# `vagrant box outdated`. This is not recommended.
config.vm.box_check_update = false
# Create a forwarded port mapping which allows access to a specific port
# within the machine from a port on the host machine. In the example below,
# accessing "localhost:8080" will access port 80 on the guest machine.
# NOTE: This will enable public access to the opened port
# config.vm.network "forwarded_port", guest: 80, host: 8080
# Create a forwarded port mapping which allows access to a specific port
# within the machine from a port on the host machine and only allow access
# via 127.0.0.1 to disable public access
# config.vm.network "forwarded_port", guest: 80, host: 8080, host_ip: "127.0.0.1"
# Create a private network, which allows host-only access to the machine
# using a specific IP.
config.vm.network "private_network", ip: "192.168.33.10"
# Create a public network, which generally matched to bridged network.
# Bridged networks make the machine appear as another physical device on
# your network.
# config.vm.network "public_network",ip:"192.168.33.10", :netmask => "255.255.255.0", :brige => "wlan0"
# Share an additional folder to the guest VM. The first argument is
# the path on the host to the actual folder. The second argument is
# the path on the guest to mount the folder. And the optional third
# argument is a set of non-required options.
config.vm.synced_folder "How-to-build-firewall-with-vagrant/data", "/vagrant_data"
# Provider-specific configuration so you can fine-tune various
# backing providers for Vagrant. These expose provider-specific options.
# Example for VirtualBox:
#
config.vm.provider "virtualbox" do |vb|
# # Display the VirtualBox GUI when booting the machine
# vb.gui = true
#
# # Customize the amount of memory on the VM:
vb.memory = "1024"
vb.cpus = 1
end
#
# View the documentation for the provider you are using for more
# information on available options.
# Enable provisioning with a shell script. Additional provisioners such as
# Puppet, Chef, Ansible, Salt, and Docker are also available. Please see the
# documentation for more information about their specific syntax and use.
# config.vm.provision "shell", inline: <<-SHELL
# apt-get update
# apt-get install -y apache2
# SHELL
end
客户端Vagrantfile 参考如下:1
2
3
4
5
6
7
8
9
10
11
12
13
14
15
16
17
18
19
20
21
22
23
24
25
26
27
28
29
30
31
32
33
34
35
36
37
38
39
40
41
42
43
44
45
46
47
48
49
50
51
52
53
54
55
56
57
58
59
60
61
62
63# -*- mode: ruby -*-
# vi: set ft=ruby :
# All Vagrant configuration is done below. The "2" in Vagrant.configure
# configures the configuration version (we support older styles for
# backwards compatibility). Please don't change it unless you know what
# you're doing.
Vagrant.configure("2") do |config|
config.vm.box = "ubuntu/trusty64"
config.vm.box_check_update = false
config.vm.hostname = "ubuntu-client"
# Create a forwarded port mapping which allows access to a specific port
# within the machine from a port on the host machine. In the example below,
# accessing "localhost:8080" will access port 80 on the guest machine.
# NOTE: This will enable public access to the opened port
# config.vm.network "forwarded_port", guest: 80, host: 8080
# Create a forwarded port mapping which allows access to a specific port
# within the machine from a port on the host machine and only allow access
# via 127.0.0.1 to disable public access
# config.vm.network "forwarded_port", guest: 80, host: 8080, host_ip: "127.0.0.1"
# Create a private network, which allows host-only access to the machine
# using a specific IP.
# config.vm.network "private_network", ip: "172.1.20.15"
# Create a public network, which generally matched to bridged network.
# Bridged networks make the machine appear as another physical device on
# your network.
config.vm.network "public_network",ip: "192.168.111.76" ,:netmask => "255.255.255.0", :bridge => 'wlan0'
# Share an additional folder to the guest VM. The first argument is
# the path on the host to the actual folder. The second argument is
# the path on the guest to mount the folder. And the optional third
# argument is a set of non-required options.
config.vm.synced_folder "How-to-build-firewall-with-vagrant/data", "/vagrant_data"
config.vm.provider "virtualbox" do |vb|
#
vb.memory = "1024"
vb.cpus = 1
end
# Provider-specific configuration so you can fine-tune various
# backing providers for Vagrant. These expose provider-specific options.
# Example for VirtualBox:
#
#
# View the documentation for the provider you are using for more
# information on available options.
# Enable provisioning with a shell script. Additional provisioners such as
# Puppet, Chef, Ansible, Salt, and Docker are also available. Please see the
# documentation for more information about their specific syntax and use.
# config.vm.provision "shell", inline: <<-SHELL
# apt-get update
# apt-get install -y apache2
# SHELL
end
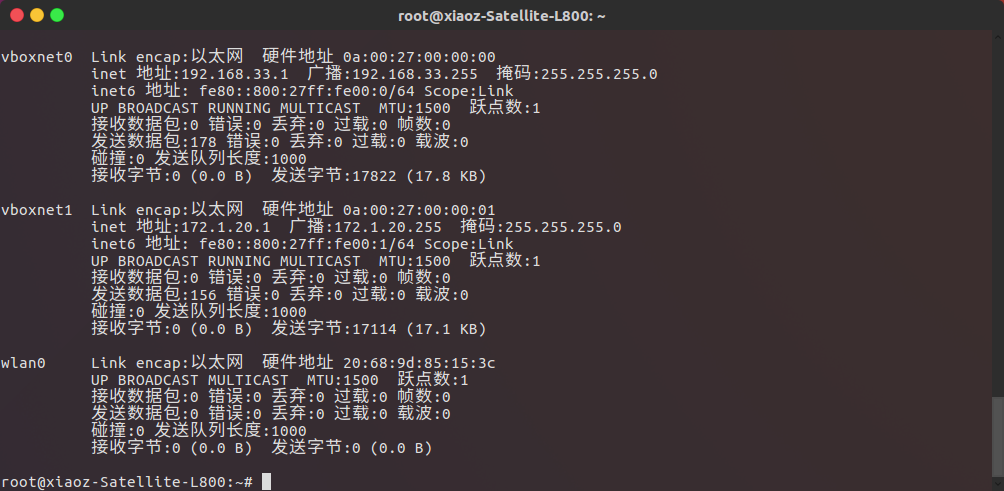
vagrant up启动两台虚拟机后,主机网卡如下:
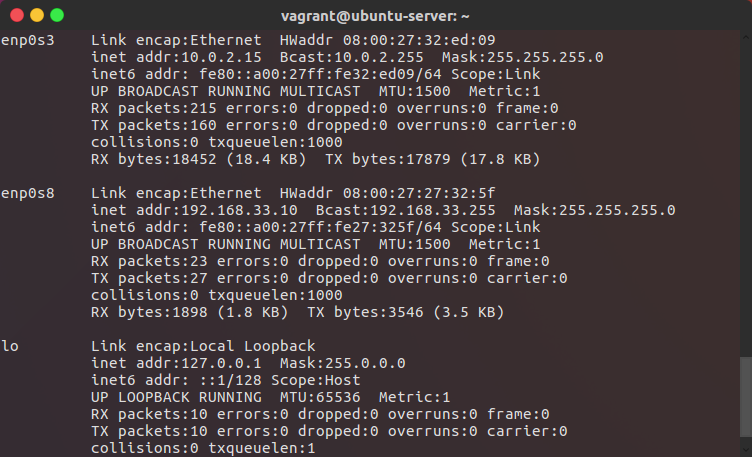
服务器网卡配置如下:
客户端网卡配置如下:
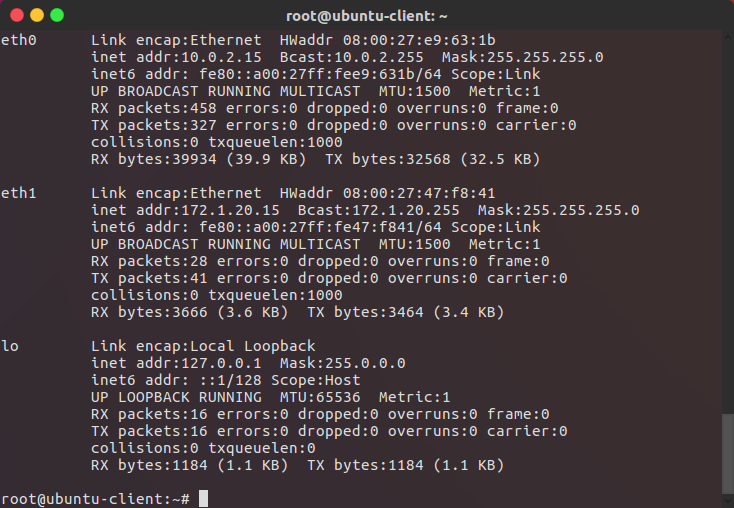
注:10.0.2.15是vagrant为保证虚拟机可以访问外网而创建,它直接与主机(host)相连
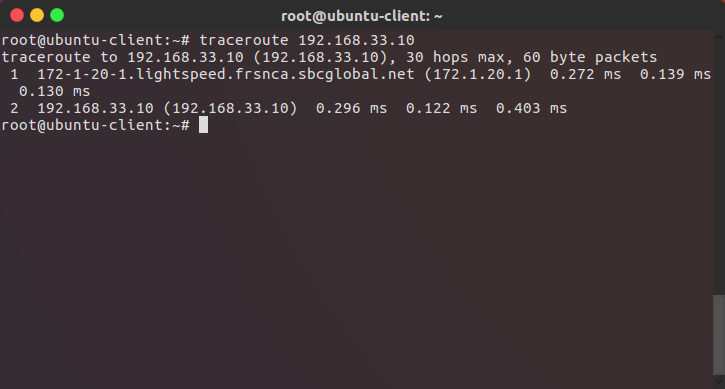
如果在客户端上直接输入 traceroute 192.168.33.10
会返回如下图所示的情况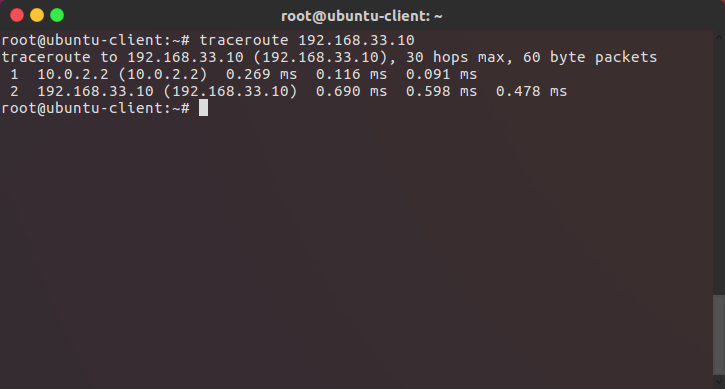
网络会直接走默认的路由,即从NAT网络过,而非Host only网络过,因此,需要在客户端和服务器上设置静态路由
客户端 172.1.20.15 网关 172.1.20.1(主机的vboxnet1网络接口地址)
服务器 192.168.33.10 网关 192.168.33.1(主机vboxnet0 网络接口地址)
操作如下
在客户端虚拟机上的路由表上设置网关1
ruote add -net 192.168.33.0/24 gw 172.1.20.1 #客户端自己网段的网关
完成后,客户端路由表如下:
在服务器虚拟机上设置默认网关1
ruote add -net 172.1.20.0/24 gw 192.168.33.1 #服务器自己网段的网关
完成后,服务器路由表如下: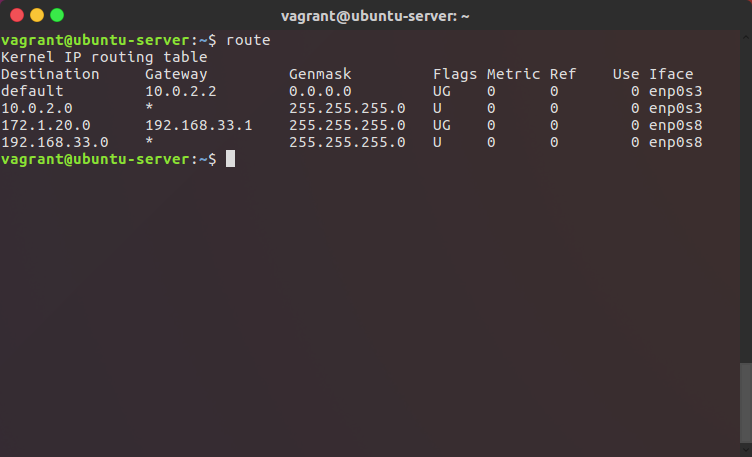
若想永久生效,则编辑各自的 /etc/network/interfaces
在对应的网卡上添加 1
up route add -net 192.168.33.0/24 gw 172.1.20.1 #客户端

1
up route add -net 172.1.20.0/24 gw 192.168.33.1 #服务器
再次traceroute 192.168.33.10