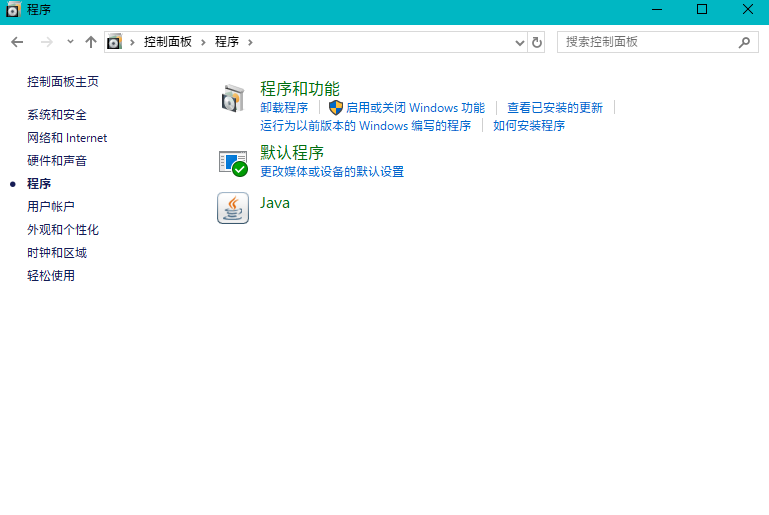
snort安装
安装snort方式
安装snort可以采用源码安装方式或直接在仓库中抓取二进制文件,源码安装方式需要手动安装一些依赖(所用软件中已给出),如pcap,pcre,libdnet,daq等
### 1.安装snort1
2
3
4sudo apt-get install -y build-essential
sudo apt-get install -y libpcap-dev libpcre3-dev libdumbnet-dev
sudo apt-get install -y bison flex
sudo apt-get install -y snort
2.安装daq (附件中有)
1 | wget https://www.snort.org/downloads/snort/daq-2.0.6.tar.gz |
./configure
如果有仓库中却少相关的依赖需要安装 例如bison,flex,libpcap1
sudo apt-get install bison flex
下载libpcap源码安装1
2
3
4
5
6wget http://www.tcpdump.org/release/libpcap-1.8.1.tar.gz
tar zxvf libpcap-1.8.1.tar.gz
./configure
make
sudo make intall
sudo cp /usr/local/lib/libpcap.* /usr/lib/
回到daq配置./configure
无报错1
2
3
4
5
6
7Build AFPacket DAQ module.. : yes
Build Dump DAQ module...... : yes
Build IPFW DAQ module...... : yes
Build IPQ DAQ module....... : no
Build NFQ DAQ module....... : no
Build PCAP DAQ module...... : yes
Build netmap DAQ module...... : no
编译安装1
2make
sudo make install
防火墙环境搭建
防火墙环境搭建
1.网络拓扑图
如下:
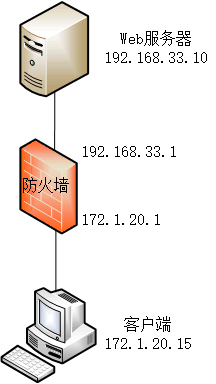
主机(ubuntu 16.04)作路由器,架设防火墙,在主机上使用Vagrant和Virtualbox建立两台虚拟机,一台作Web服务器,一台作客户端,按上图设置ip地址。
Web服务器Vagrantfile参考如下:1
2
3
4
5
6
7
8
9
10
11
12
13
14
15
16
17
18
19
20
21
22
23
24
25
26
27
28
29
30
31
32
33
34
35
36
37
38
39
40
41
42
43
44
45
46
47
48
49
50
51
52
53
54
55
56
57
58
59
60
61
62
63
64
65
66
67
68
69
70
71
72
73
74
75
76# -*- mode: ruby -*-
# vi: set ft=ruby :
# All Vagrant configuration is done below. The "2" in Vagrant.configure
# configures the configuration version (we support older styles for
# backwards compatibility). Please don't change it unless you know what
# you're doing.
Vagrant.configure("2") do |config|
# The most common configuration options are documented and commented below.
# For a complete reference, please see the online documentation at
# https://docs.vagrantup.com.
# Every Vagrant development environment requires a box. You can search for
# boxes at https://vagrantcloud.com/search.
config.vm.box = "ubuntu/trusty64"
# config.vm.define "ubuntu-server"
config.vm.hostname ="ubuntu-server"
# Disable automatic box update checking. If you disable this, then
# boxes will only be checked for updates when the user runs
# `vagrant box outdated`. This is not recommended.
config.vm.box_check_update = false
# Create a forwarded port mapping which allows access to a specific port
# within the machine from a port on the host machine. In the example below,
# accessing "localhost:8080" will access port 80 on the guest machine.
# NOTE: This will enable public access to the opened port
# config.vm.network "forwarded_port", guest: 80, host: 8080
# Create a forwarded port mapping which allows access to a specific port
# within the machine from a port on the host machine and only allow access
# via 127.0.0.1 to disable public access
# config.vm.network "forwarded_port", guest: 80, host: 8080, host_ip: "127.0.0.1"
# Create a private network, which allows host-only access to the machine
# using a specific IP.
config.vm.network "private_network", ip: "192.168.33.10"
# Create a public network, which generally matched to bridged network.
# Bridged networks make the machine appear as another physical device on
# your network.
# config.vm.network "public_network",ip:"192.168.33.10", :netmask => "255.255.255.0", :brige => "wlan0"
# Share an additional folder to the guest VM. The first argument is
# the path on the host to the actual folder. The second argument is
# the path on the guest to mount the folder. And the optional third
# argument is a set of non-required options.
config.vm.synced_folder "How-to-build-firewall-with-vagrant/data", "/vagrant_data"
# Provider-specific configuration so you can fine-tune various
# backing providers for Vagrant. These expose provider-specific options.
# Example for VirtualBox:
#
config.vm.provider "virtualbox" do |vb|
# # Display the VirtualBox GUI when booting the machine
# vb.gui = true
#
# # Customize the amount of memory on the VM:
vb.memory = "1024"
vb.cpus = 1
end
#
# View the documentation for the provider you are using for more
# information on available options.
# Enable provisioning with a shell script. Additional provisioners such as
# Puppet, Chef, Ansible, Salt, and Docker are also available. Please see the
# documentation for more information about their specific syntax and use.
# config.vm.provision "shell", inline: <<-SHELL
# apt-get update
# apt-get install -y apache2
# SHELL
end
客户端Vagrantfile 参考如下:1
2
3
4
5
6
7
8
9
10
11
12
13
14
15
16
17
18
19
20
21
22
23
24
25
26
27
28
29
30
31
32
33
34
35
36
37
38
39
40
41
42
43
44
45
46
47
48
49
50
51
52
53
54
55
56
57
58
59
60
61
62
63# -*- mode: ruby -*-
# vi: set ft=ruby :
# All Vagrant configuration is done below. The "2" in Vagrant.configure
# configures the configuration version (we support older styles for
# backwards compatibility). Please don't change it unless you know what
# you're doing.
Vagrant.configure("2") do |config|
config.vm.box = "ubuntu/trusty64"
config.vm.box_check_update = false
config.vm.hostname = "ubuntu-client"
# Create a forwarded port mapping which allows access to a specific port
# within the machine from a port on the host machine. In the example below,
# accessing "localhost:8080" will access port 80 on the guest machine.
# NOTE: This will enable public access to the opened port
# config.vm.network "forwarded_port", guest: 80, host: 8080
# Create a forwarded port mapping which allows access to a specific port
# within the machine from a port on the host machine and only allow access
# via 127.0.0.1 to disable public access
# config.vm.network "forwarded_port", guest: 80, host: 8080, host_ip: "127.0.0.1"
# Create a private network, which allows host-only access to the machine
# using a specific IP.
# config.vm.network "private_network", ip: "172.1.20.15"
# Create a public network, which generally matched to bridged network.
# Bridged networks make the machine appear as another physical device on
# your network.
config.vm.network "public_network",ip: "192.168.111.76" ,:netmask => "255.255.255.0", :bridge => 'wlan0'
# Share an additional folder to the guest VM. The first argument is
# the path on the host to the actual folder. The second argument is
# the path on the guest to mount the folder. And the optional third
# argument is a set of non-required options.
config.vm.synced_folder "How-to-build-firewall-with-vagrant/data", "/vagrant_data"
config.vm.provider "virtualbox" do |vb|
#
vb.memory = "1024"
vb.cpus = 1
end
# Provider-specific configuration so you can fine-tune various
# backing providers for Vagrant. These expose provider-specific options.
# Example for VirtualBox:
#
#
# View the documentation for the provider you are using for more
# information on available options.
# Enable provisioning with a shell script. Additional provisioners such as
# Puppet, Chef, Ansible, Salt, and Docker are also available. Please see the
# documentation for more information about their specific syntax and use.
# config.vm.provision "shell", inline: <<-SHELL
# apt-get update
# apt-get install -y apache2
# SHELL
end
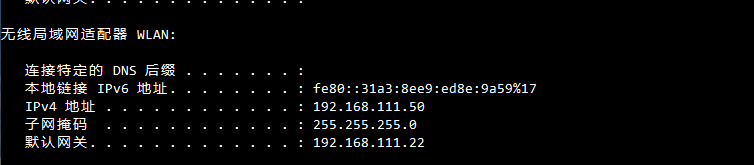
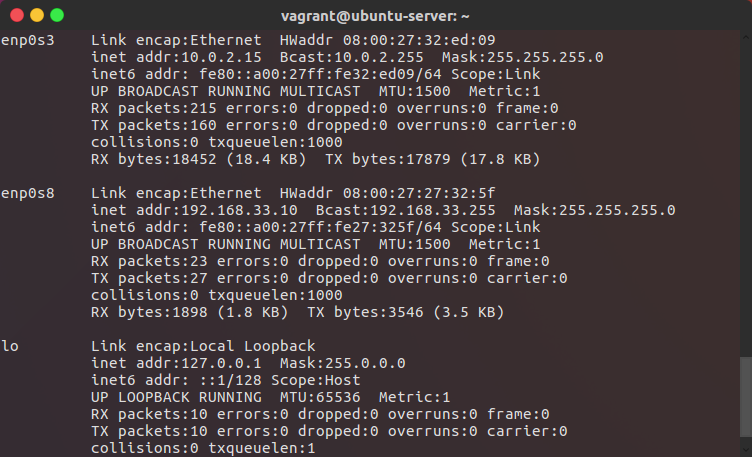
vagrant up启动两台虚拟机后,主机网卡如下:
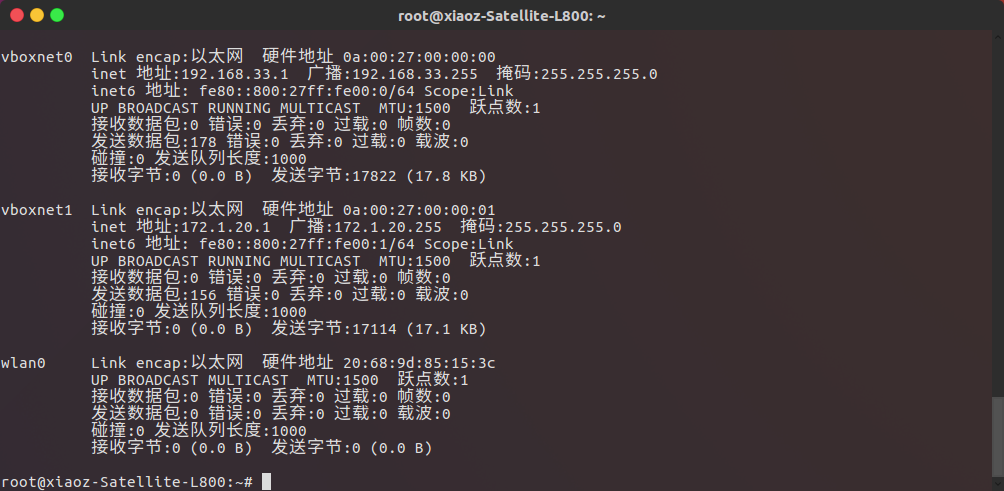
服务器网卡配置如下:
客户端网卡配置如下:
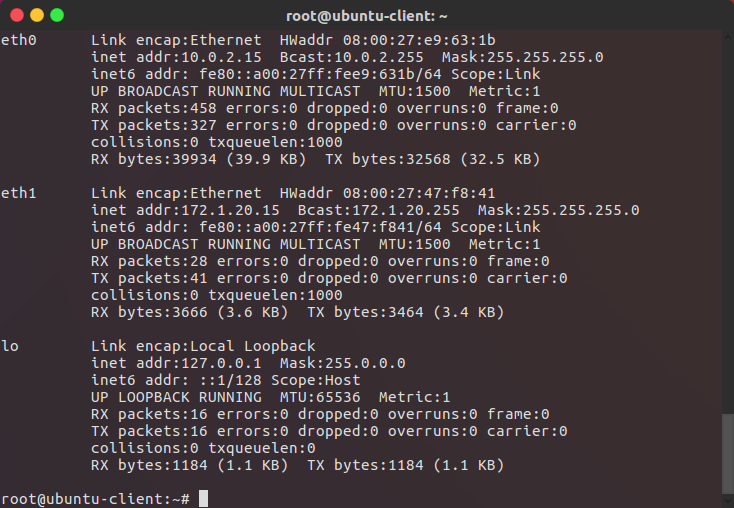
注:10.0.2.15是vagrant为保证虚拟机可以访问外网而创建,它直接与主机(host)相连
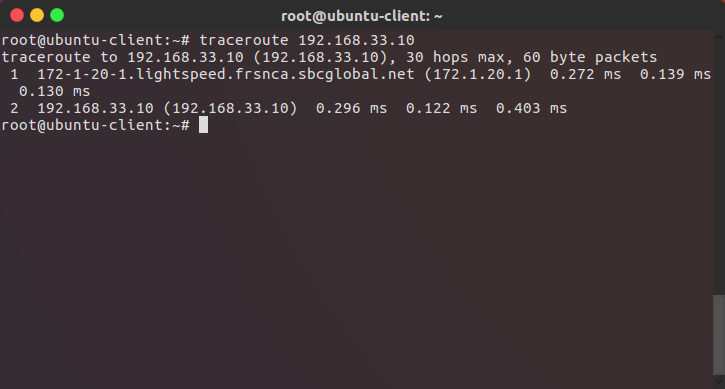
如果在客户端上直接输入 traceroute 192.168.33.10
会返回如下图所示的情况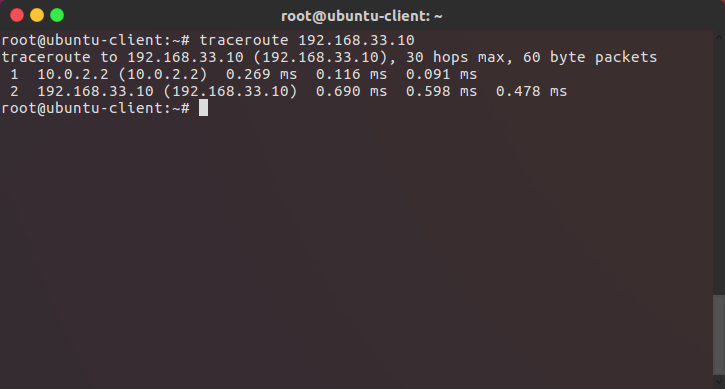
网络会直接走默认的路由,即从NAT网络过,而非Host only网络过,因此,需要在客户端和服务器上设置静态路由
客户端 172.1.20.15 网关 172.1.20.1(主机的vboxnet1网络接口地址)
服务器 192.168.33.10 网关 192.168.33.1(主机vboxnet0 网络接口地址)
操作如下
在客户端虚拟机上的路由表上设置网关1
ruote add -net 192.168.33.0/24 gw 172.1.20.1 #客户端自己网段的网关
完成后,客户端路由表如下:
在服务器虚拟机上设置默认网关1
ruote add -net 172.1.20.0/24 gw 192.168.33.1 #服务器自己网段的网关
完成后,服务器路由表如下: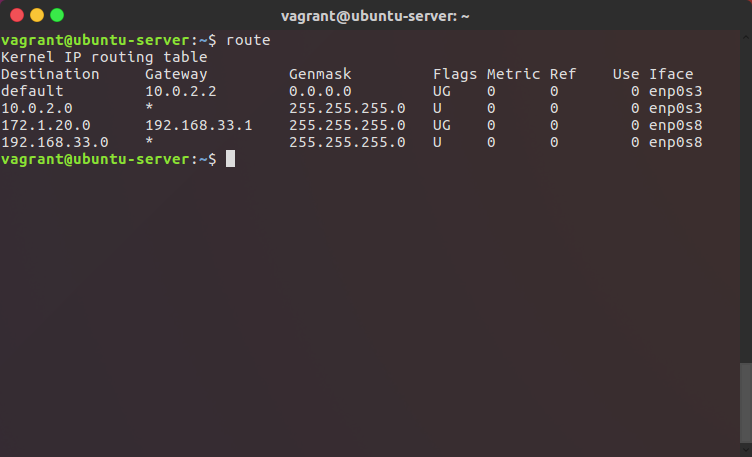
若想永久生效,则编辑各自的 /etc/network/interfaces
在对应的网卡上添加 1
up route add -net 192.168.33.0/24 gw 172.1.20.1 #客户端

1
up route add -net 172.1.20.0/24 gw 192.168.33.1 #服务器
再次traceroute 192.168.33.10
虚拟化工具Vagrant简明使用教程
虚拟化工具Vagrant简明使用教程
简单介绍
如果你有一台物理服务器,现在需要租出去,你会怎么做呢?直接出租出去?当然是变成多台,然后分别出租出去呀,怎么做呢?答案是:虚拟化!
早年服务器的租用费用很高,而现在,一台云服务器,学生都可以以白菜价拥有了,当你拥有自己的VPS,可以在上面搭建网站,ftp服务器,或者是自建的云盘,如果是国外的vps,你还可以自建一个梯子,连接外面的世界。
一台物理服务器,通常配置比较高,一个16核32线程的服务器,可以开31台云服务器(如果是docker这种轻量级服务器,可以运行的更多),依靠的是虚拟化技术,这些云服务器,实际是运行在物理服务器上的虚拟机。但是这些虚拟机都要一个一个的安装吗?这样做效率很低,于是便有了容器编排工具,例如vagrant
Vagrant是一个基于Ruby的工具,用于创建和部署虚拟化开发环境。它使用Oracle的开源VirtualBox虚拟化系统,使用 Chef创建自动化虚拟环境 (来自百度百科)
vagrant 不仅用于服务器领域,也可以用在个人的学习,测试环境中,安装和启动比直接安装快得多。比如,你先搭建一个网站开发环境,可以去官网找到别人打包好的镜像,直接使用别人分享的成果,或者想做测试,又怕改变本机的环境,可以提供一个隔离的环境。下面做一个简单的介绍,详细教程可以查看官方文档:vagrant docs
1.安装
vagrant是全平台的,但它的使用需要结合虚拟机管理,最常用的是开源的virtualbox,因此需要安装vagrant和virtualbox
2.常用命令
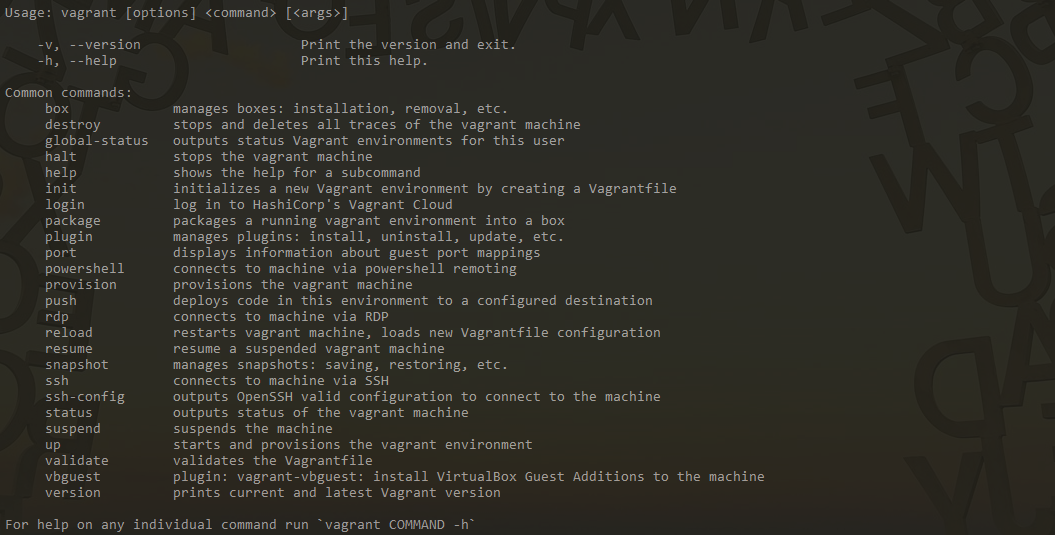
vagrant命令都是以vagrant 开头的,在终端中输入vagrant -h 可以看到常用的一些命令,如果想查看具体的命令,可以在子命令下加-h参数,例如vagrant box -h 或 vagrant box add -h,可以找到与box镜像操作相关的使用帮助。
3.导入一个base box
vagrant 并不是虚拟机,它是一种与虚拟机结合起来用的编排工具,本身也不生产系统镜像,vagrant使用的镜像被称为base box,可以在vagrant官网上找到,也可以在github上找到。导入一个box的命令:1
2vagrant box add {name} {url}
vagrant init {name} #导入box并生成Vagrantfile文件
box镜像在亚马逊的服务器上,因此在国内,直接添加可能会非常慢,可以先下载离线镜像,然后在导入,离线下载方法:
url + versions/版本号/ + /providers/virtualbox.box
eg:
https://app.vagrantup.com/ubuntu/boxes/xenial64/versions/20180126.0.0/providers/virtualbox.box
导入离线镜像到仓库时,url为box文件的路径
vagrant box add /path/to/your/box
直接添加离线box时,会元数据,因此版本号会变成0,可以通过json文件添加box,如下:
eg:可以将ubuntu/trusty64.json文件与ubuntu/trusty64.box文件放在同一个文件夹
1 | { |
vagrant box add ubuntu/trusty64.json
查看已添加的box: vagrant box list
Windows上默认box仓库在C盘用户文件夹的”.vagrant.d”中,如果C盘不够,可以通过设置环境变量’ VAGRANT_HOME’,改变此文件夹的位置
4.启动并设置虚拟机
1 | vagrant init title #eg: vagrant init ubuntu/trusty64 |
vagrant init 会生成Vagrantfile文件,可以编辑Vagrantfile文件,对虚拟机进行一些自定义设置,Vagrantfile是ruby脚本,但没学过ruby也可以无压力看懂。
eg:
1 | # -*- mode: ruby -*- |
每一部分的含义
1 | # Installation script |
以上是provision的内容,定义了在第一次启动时,虚拟机执行的操作,可以进行一些自动化部署
config.vm.network 设定网络,有三种,private_network(对应虚拟机Host only),public_network(对应虚拟机桥接模式,需要指定桥接的网卡,ip地址和子网掩码),forwarded_port,把主机上x端口的请求,发送到虚拟机Y端口上处理
下图是ifconfig查看的网络情况,eth0 是NAT模式(vagrant设置的,必要的,用于连接网络),eth1是私有网络(host only)为手动设置的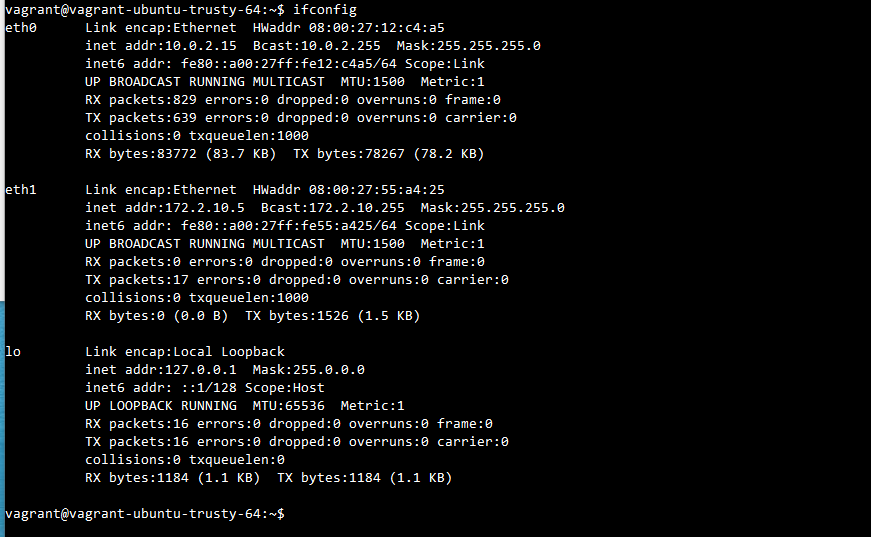
hostname 虚拟机中的主机名称(终端上显示的名称),是区分多台虚拟机的重要方式
1 | config.ssh.username = "vagrant" |
ssh登录方式,可以使用 用户名和密码登录,也可以使用公钥对登录,默认使用公钥对登录,默认用户名和密码都是”vagrant”
config.vm.synced_folder
共享文件夹,用于快速在虚拟机和主机之间传送数据
1 | vb.memory = "1024" |
设定虚拟机的内存和核心数
如遇到虚拟机中的Virtualbox guest additions与Virtualbox中的不匹配会有如下提示:
The guest additions on this VM do not match the install version of VirtualBox! This may cause things such as forwarded ports, shared folders, and more to not work properly. If any of those things fail on this machine, please update the guest additions and repackage the box.
可以通过安装vbguest插件来解决,下次启动时会自动安装新的插件vagrant plugin install vagrant-vbguest
5.登录虚拟机
base box多数是没有图形界面的(程序员要啥图形界面 [滑稽脸]),virtualbox的界面太难用,因此选择用ssh连接,vagrant有自带的ssh工具,vagrant ssh,会根据自动生成的密钥对直接登录进入系统,vagrant ssh-config 可以查看ssh的配置。
Windows上没有ssh客户端,可以选择git bash,或者openssh(windows上,对公钥对的权限有严格要求,有时会导致无法登录,优点是集成到cmd或powershell,但不推荐),也可以使用xshell,putty等工具1
2vagrant ssh
ssh username@{ip}
6. 查看状态,挂起,关机
1 | vagrant status #查看状态 |
7. 销毁和移除box
vagrant destroy 这个命令会删除virtualbox创建的虚拟机但不会移除仓库中的box 文件,移除box用 vagrant box remove box-name
8.导出镜像
当你在虚拟机中做了许多工作后,你可以导出镜像,分享给其他人使用,也可以留存自己使用,节省下次配置的时间。
private_network 需要清除一下网络状态:sudo rm -f /etc/udev/rule.d/70-persistent-net.rules
vagrant halt 先关机
在工程文件夹下(对应的Vagrantfile所在文件夹)1
2vagrant status #查看状态
vagrant package --output your-box-name.box
详细信息请查看 Creating a Base Box
9 同时启动多台虚拟机
附上大神老师写的一次启动多台机器(可用于集群管理)的脚本
2
3
4
5
6
7
8
9
10
11
12
13
14
15
16
17
18
19
20
21
22
23
24
25
26
27
28
29
# vi: set ft=ruby :
Vagrant.configure("2") do |config|
config.vm.box = "ubuntu-xenial-docker"
config.vm.box_version = "1.0.0-1502068394"
config.vm.box_check_update = false
config.vm.provider "virtualbox" do |vb|
vb.memory = "1024"
vb.cpus = 1
end
ssh_key_public = File.readlines("./insecure-key.pub").first.strip
config.vm.provision 'shell', inline: "echo #{ssh_key_public} >> /home/vagrant/.ssh/authorized_keys"
config.vm.provision "file", source: "./insecure-key", destination: "/home/vagrant/.ssh/id_rsa"
config.vm.provision 'shell', inline: "chmod 400 /home/vagrant/.ssh/id_rsa"
IP0 = 20
(1..3).each do |i|
config.vm.define "node#{i}" do |node|
node.vm.network "private_network", ip: "192.168.33.#{i + IP0}"
node.vm.hostname = "node#{i}"
node.vm.synced_folder "./data", "/vagrant_data", create: true, owner: "root", group: "root"
node.vm.provision "shell", inline: <<-SHELL
echo "This is node#{i}" > /etc/motd
SHELL
end
end
end
希望对你有所帮助!
squid代理服务器安装教程
本教程介绍ubuntu上安装代理服务器软件squid3,适用于实验1.3应用代理实验
1.安装squid3
1 | sudo apt-get update |
2.配置squid3
1 | sudo vim /etc/squid3/squid.conf |
2.1 代理端口号
在文件中搜索http_port 3128可以修改服务端监听端口,记录下端口号,浏览器设置代理时要用到此端口号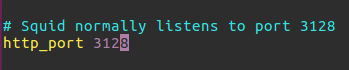
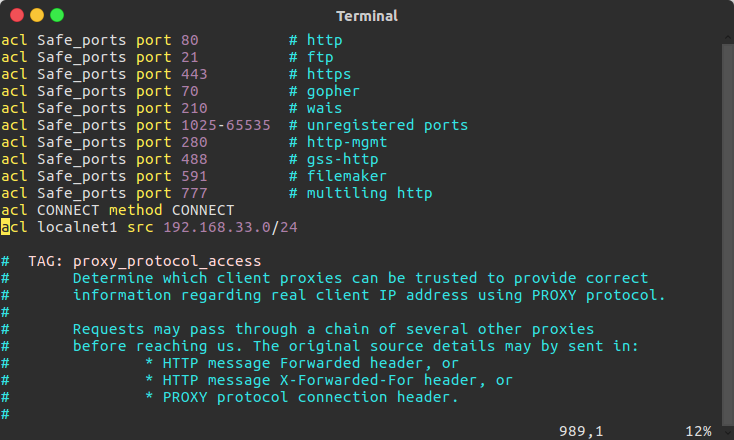
2.2 设置允许访问的ip段,服务器默认不代理任何客户端
在文件中搜索1
acl CONNECT method ...
在后面加入
1
acl localnet1 src 192.168.33.0/24
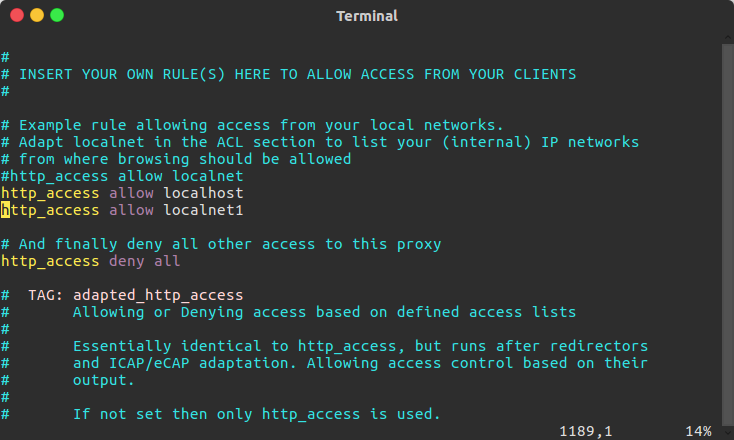
2.3 授权给这一指定的ip段
在文件中找到1
http_access allow localhost
在后面添加
1
http_access allow localnet1
3.重启服务
1 | sudo service squid3 restart |